Battery switch on travel trailer function is crucial for managing your RV’s power. Understanding how to use this switch safely and effectively is key to preventing electrical problems and ensuring a smooth camping experience. This guide will walk you through the different types of switches, how to connect and disconnect your batteries, troubleshoot common issues, and maintain your system for years of reliable service.
We’ll cover everything from the basics of a simple on/off switch to more complex systems with multiple battery banks. You’ll learn how to safely connect and disconnect your batteries, avoiding potential hazards like short circuits. We’ll also delve into troubleshooting, helping you diagnose and fix common problems, saving you time and money on potential repairs.
Connecting and Disconnecting Batteries

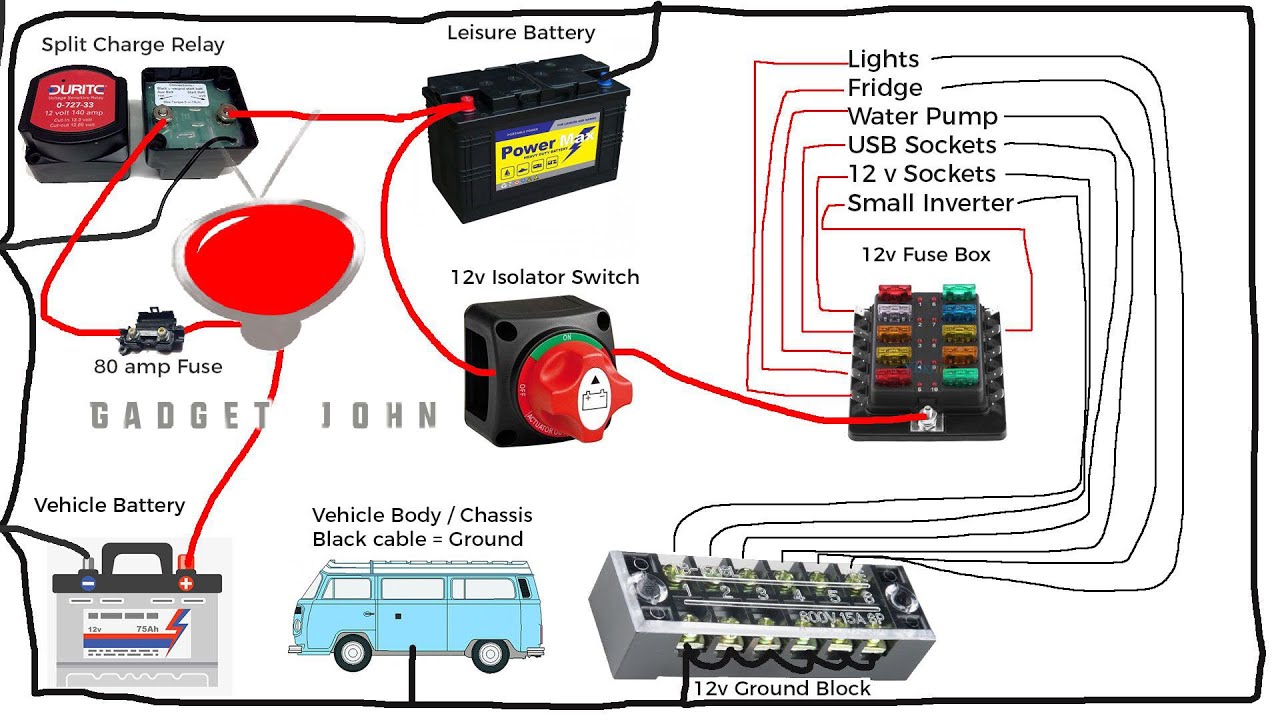
Properly connecting and disconnecting your travel trailer’s batteries is crucial for safety and to ensure the longevity of your battery system. This involves understanding the different battery types (chassis and house batteries), their connections, and the best practices for maintenance. Ignoring these procedures can lead to damage, electrical issues, and even fire hazards.Connecting a travel trailer’s battery system typically involves connecting the chassis battery (used for starting the trailer’s engine, if applicable) and the house battery (powering the interior lights, appliances, etc.).
These batteries might be connected in parallel to share the load or independently depending on your setup. Always consult your trailer’s wiring diagram to understand your specific configuration.
Connecting Batteries
Connecting batteries requires careful attention to polarity. The positive (+) terminal of one battery must connect to the positive terminal of the other, and the same applies to the negative (-) terminals. Use appropriately sized battery cables and connectors. Clean the battery terminals thoroughly before connecting to ensure a good electrical connection. Loose connections create resistance and can lead to overheating and corrosion.
So, you’re planning a trip? Awesome! Don’t forget travel insurance! Check out this helpful resource on aon travel insurance to get started. It’s super important to understand your coverage, especially if you’re going somewhere adventurous. Then, for some real-world examples and reviews, you might want to check out this blog post on aon travel insurance – it gives some great insights from other travelers.
Getting the right insurance can save you a ton of headaches down the road, so do your research!
A properly connected system will ensure that power flows smoothly throughout your trailer. Improper connections can result in a short circuit, potentially causing sparks, damage to electrical components, or even a fire. Never force connections; if they don’t fit easily, check for obstructions or incorrect wiring.
Maintaining Battery Connections, Battery switch on travel trailer function
Regular inspection and maintenance of battery connections are essential to prevent corrosion. Corrosion buildup on the terminals creates resistance, reducing the efficiency of the battery and potentially causing damage. To maintain clean connections, periodically inspect the terminals and clean them with a wire brush or a battery terminal cleaner. Apply a corrosion inhibitor or dielectric grease to the terminals after cleaning to prevent future corrosion.
This will ensure that the connections remain reliable and that your batteries perform optimally. Neglecting this maintenance can lead to reduced battery life, poor electrical performance, and potentially hazardous situations.
Consequences of Improper Connections
Improperly connecting or disconnecting batteries can have several serious consequences. A reversed connection (connecting positive to negative) will cause a short circuit, potentially resulting in sparks, overheating, and damage to the battery or other electrical components. Loose connections can lead to voltage drops, reduced performance of appliances, and even a fire hazard due to arcing. Damage to the battery itself can occur due to excessive current draw caused by improper connections.
It’s crucial to follow the correct procedures to avoid these problems.
So, you’re planning a trip? Awesome! Don’t forget travel insurance! Check out this helpful resource on aon travel insurance to get a better understanding of your coverage options. Then, for some real-life experiences and reviews, dive into this blog post about aon travel insurance – it might help you decide what level of coverage is right for you and your adventure.
Seriously, getting insured before you go is a total game-changer for peace of mind!
Disconnecting Batteries for Long-Term Storage
When storing your travel trailer for an extended period, it’s best to disconnect the batteries to prevent parasitic drain. This drain occurs even when the trailer is not in use, slowly depleting the battery charge over time. To disconnect the batteries safely, first turn off all power sources within the trailer. Then, disconnect the negative (-) terminal of each battery first, followed by the positive (+) terminal.
This helps prevent accidental short circuits. Store the batteries in a cool, dry place and check their charge periodically to ensure they don’t become completely discharged. This will extend the life of your batteries and save you from a dead battery when you’re ready to use your trailer again.
Troubleshooting Common Battery Switch Issues: Battery Switch On Travel Trailer Function
Dealing with a finicky battery switch in your travel trailer can be frustrating, but with a systematic approach, you can usually pinpoint and fix the problem. Understanding the common causes and troubleshooting steps will save you time and potential headaches on the road. This section Artikels common issues, their causes, and how to resolve them.
Common Battery Switch Problems and Their Causes
Several issues can arise with your travel trailer’s battery switch, leading to a lack of power or erratic electrical behavior. These problems often stem from simple issues that can be easily addressed with basic troubleshooting. Let’s explore some of the most frequent problems and their potential root causes.
- No Power: This is the most obvious problem. Causes include a faulty switch, corroded connections at the battery or switch, a blown fuse, or a problem within the trailer’s wiring itself.
- Flickering Lights: Intermittent power suggests loose connections, a corroding switch, or a failing battery. The flickering could also indicate a larger electrical issue within the trailer’s system.
- Switch Doesn’t Move Freely: A stiff or unresponsive switch may indicate corrosion, debris, or internal mechanical failure. Forcing a jammed switch could cause further damage.
- Battery Not Charging: If your batteries aren’t charging, even when the switch is in the correct position, check the charging system itself, ensure the converter is functioning, and verify connections between the battery and the charging source.
Troubleshooting Steps for Battery Switch Problems
A methodical approach is key to efficiently diagnosing battery switch problems. Start with the simplest checks and move to more involved investigations only if necessary.
- Visual Inspection: Begin by carefully inspecting the battery switch itself. Look for any obvious signs of damage, corrosion on the terminals or connections, or loose wiring. Clean any corrosion using a wire brush and baking soda solution.
- Check Fuses and Breakers: Locate the fuses and circuit breakers associated with your battery system. Replace any blown fuses and reset any tripped breakers. Remember to always use the correct amperage fuse replacement.
- Test Battery Voltage: Use a multimeter to measure the voltage of your batteries. A low voltage reading indicates a problem with the battery itself, not necessarily the switch.
- Test Switch Continuity: With the multimeter, check the continuity of the switch in different positions. A lack of continuity indicates a faulty switch that needs replacement.
- Inspect Wiring: Carefully examine the wiring leading to and from the battery switch. Look for any signs of damage, fraying, or loose connections. Repair or replace any damaged wiring.
Troubleshooting Flowchart
A flowchart provides a visual representation of the troubleshooting process. This aids in systematic problem-solving.
Imagine a flowchart starting with “No Power/Flickering Lights?”. The first branch leads to “Visual Inspection of Switch and Connections?”, then to “Clean Corrosion/Tighten Connections?”. If the problem persists, another branch leads to “Check Fuses/Breakers?”. If still unresolved, it branches to “Test Battery Voltage?”, and finally to “Test Switch Continuity?”. If the switch is faulty, the solution is “Replace Switch”. If the battery is low, the solution is “Charge Battery”. If wiring is damaged, the solution is “Repair/Replace Wiring”. Each ‘No’ answer leads back to previous steps, or to a more in-depth investigation.
Battery Switch and Electrical System Integration
Your battery switch is the central nervous system of your travel trailer’s power, controlling the flow of electricity from your batteries to the rest of your electrical system. Understanding how it interacts with other components is key to preventing problems and ensuring a smooth power supply.The battery switch acts as a gatekeeper, selectively routing power from your batteries to different parts of your RV’s electrical system.
This means it influences everything from your lights and appliances to your charging systems. When the switch is in the “on” position, power flows from the batteries to the converter, which then transforms the DC power from your batteries into AC power for your household appliances. Conversely, the inverter takes AC power (from shore power or the generator) and converts it to DC power to charge your batteries.
The battery switch prevents the batteries from discharging through the inverter unless it is explicitly switched to that position. Different battery switch configurations (e.g., two-battery switches) allow for more complex power management, such as prioritizing one battery bank for essential functions.
Power Distribution Management by the Battery Switch
The battery switch’s primary function is to control the flow of electricity to different loads within the trailer. When the switch is off, all power from the batteries is cut off, preventing accidental discharge. When it’s on, the power flows to the various circuits in the trailer. The switch can often be used to isolate different battery banks, allowing you to use one bank for essential functions while conserving the charge in another.
For instance, you might use one battery bank for lights and water pump, and a second for the air conditioner. This selective power management extends the life of your batteries and prevents unexpected power outages.
Diagram of Electrical System Flow
Imagine a simple diagram. We start with two batteries connected to a two-battery switch. From the switch, two main lines emerge. One line goes to the converter, which is responsible for converting 12V DC power from the batteries to 120V AC power to run your household appliances. The other line connects directly to the 12V DC circuits in your trailer, powering lights, water pumps, and other DC devices.
A separate line from shore power or a generator connects to the converter and also to the battery charger. The charger uses this AC power to replenish the batteries. The inverter, often connected to the AC side, converts AC power to DC to charge accessories, but the battery switch controls whether the batteries can supply power to the inverter.
Safety Precautions When Working with the Travel Trailer’s Electrical System
Working with electricity always carries inherent risks. Before you begin any work on your travel trailer’s electrical system, it’s crucial to prioritize safety.
- Always disconnect the negative (-) battery cable before performing any work on the electrical system. This ensures that you’re working with a completely de-energized system.
- Use insulated tools to prevent accidental shocks. Never work with wet hands or in wet conditions.
- Consult your travel trailer’s wiring diagram to understand the system’s layout and identify individual circuits. Improper wiring can lead to shorts and fires.
- If you’re unsure about any aspect of the electrical system, consult a qualified RV technician. Attempting repairs beyond your skill level can result in damage or injury.
- Always use appropriately sized fuses and circuit breakers to protect your system from overloads. Replacing fuses with higher amperage ones can create fire hazards.
Battery Switch Maintenance and Replacement
Keeping your travel trailer’s battery switch in top condition is crucial for reliable power. Regular maintenance prevents problems and extends the lifespan of the switch, saving you time and money in the long run. Neglecting maintenance can lead to corrosion, poor connections, and ultimately, switch failure.Regular maintenance involves a simple but effective schedule to ensure your battery switch functions flawlessly.
This includes visual inspections and cleaning to prevent corrosion build-up, which is a common culprit in battery switch malfunctions.
Battery Switch Maintenance Schedule
A good rule of thumb is to inspect your battery switch at least twice a year, more often if you live in a humid climate or store your trailer outdoors. This visual check should include examining the switch itself, the connecting terminals, and the wiring for any signs of damage or corrosion.
- Every 3 Months (or after each extended trip): Visually inspect the battery switch and terminals for corrosion, loose connections, or any signs of damage. Clean any corrosion with a wire brush and baking soda solution.
- Every 6 Months: Tighten all terminal connections. Use a wrench appropriate for the size of the terminal bolts. Don’t over-tighten, as this can damage the terminals.
- Annually: Apply a thin layer of dielectric grease to the terminals to prevent corrosion. This grease helps repel moisture and keeps the connections clean.
Replacing a Faulty Battery Switch
Replacing a battery switch is a straightforward process, but it’s important to disconnect the battery before starting any work to avoid electrical shocks. Remember to always follow safety precautions when working with electrical systems.
- Disconnect the Battery: Disconnect both the positive (+) and negative (-) battery terminals.
- Remove the Old Switch: Unscrew the mounting bolts securing the switch to the trailer’s frame. Disconnect the wires from the switch terminals. Take note of which wire goes to which terminal.
- Install the New Switch: Mount the new switch using the same mounting holes as the old switch. Connect the wires to the corresponding terminals, ensuring a secure connection. Double-check your connections to ensure they are correct.
- Reconnect the Battery: Reconnect the positive (+) and negative (-) battery terminals.
- Test the Switch: Turn the switch on and off to ensure it’s working correctly. Check your trailer’s lights and other electrical components to verify power is flowing properly.
Selecting a Replacement Battery Switch
Choosing the right replacement battery switch is essential for compatibility and safety. The new switch must have the same amperage rating and terminal configuration as the original. Pay close attention to the number of battery banks the switch supports and the type of terminals (stud, ring, etc.). It’s always a good idea to take the old switch with you to the store to ensure you get an exact replacement.
Visual Characteristics of a Corroded or Damaged Battery Switch
A corroded battery switch will exhibit a build-up of white, green, or blue powdery substance on the terminals and possibly the switch body itself. This corrosion is usually caused by exposure to moisture and/or battery acid. The terminals may appear pitted or eroded. A damaged switch may show signs of physical damage such as cracks, broken parts, or loose components.
Loose or burnt wires connected to the switch are also clear indicators of a problem. A severely corroded switch might have a visibly weakened or discolored switch body.
Mastering your travel trailer’s battery switch is a fundamental skill for any RV owner. By understanding its function, performing regular maintenance, and knowing how to troubleshoot common problems, you’ll ensure reliable power for all your adventures. Remember, safety is paramount when working with electricity, so always double-check your connections and consult a professional if you’re unsure about any aspect of your system.
Happy travels!
Answers to Common Questions
What happens if I leave the battery switch on all the time?
Leaving the switch on constantly can drain your batteries, especially if you have parasitic draws (small amounts of power used even when the trailer is off). It’s best to turn it off when not using the trailer for extended periods.
Can I use a different type of battery switch than what came with my trailer?
Yes, but ensure the replacement switch has the correct amperage rating for your system. Incorrect amperage can damage your system. Consult your trailer’s manual or an RV electrician to ensure compatibility.
How often should I check my battery connections for corrosion?
Inspect your battery connections at least once a year, or more often if you notice any performance issues. Corrosion can significantly reduce battery life and create safety hazards.
My lights are flickering. What could be the problem?
Flickering lights can indicate loose connections, a failing battery switch, or problems with your converter. Check all connections first, then consider the battery switch and converter as potential causes.
